MacOS HomeBrew 자동 업데이트/업그레이드 하는 방법
Contents
Homebrew 패키지를 자동으로 업데이트 해보자
macOS 유저에게 HomeBrew는 없어선 안 될 존재가 되어버렸죠. 많은 앱을 홈브루로 설치하고 관리할 수 있습니다.
하지만 저같이 부주의한.. ADHD 타입의 사람들은 이것저것 깔아놓고 업데이트를 까먹기 쉽습니다. 얼마전에 Homebrew gui 버전으로 관리하신다는 방문자분의 댓글이 있었는데, 그 글을 본김에 저의 homebrew 상태를 체크해보니 업데이트한지 꽤 오래된 앱들이 보여서 좀 놀랐습니다.
심지어 저도 관리하기 편하게 homebrew gui 앱을 설치해놓고 매번 쓰는거만 쓰다보니 관리가 엉망이었어요.
그래서 그냥 자동화 해놓자 싶어서 찾아보고 공유하고자 정리해둡니다.
세 가지 자동 업데이트 방법
저는 3번을 선택.
1. 홈브루 자체 오토 업데이트
자체적인 오토 업데이트 스케쥴링 기능이 있습니다. export HOMEBREW_AUTO_UPDATE_SECS=86400 이 있어요. 시간은 보통 86400초, 즉 24시간이 예시로 많이 나와있습니다. (*위 기능을 나중에 비활성화 하려면 export HOMEBREW_NO_AUTO_UPDATE="1")
하지만 이는 update만 됩니다.
- brew update: 홈브루의 저장소 및 패키지 같은 정보를 업데이트 하는 것.
- brew upgrade: 홈브루를 통해 설치한 앱들을 최신 버전으로 업데이트 하는 것.
그래서 앱 업데이트까지 하려면 launchd를 통해 스케쥴 돌리는 정보가 많이 나옵니다.
2. Launchd
리눅스의 cron 같이 백그라운드에서 내가 작성해둔 작업을 정한 시간대에 수행합니다.
sh 파일에 업데이트, 업그레이드, 클린업 내용 넣고.. plist 만들고 launchd 등록하고 하는 것을 AI에게 물어보면 상세하게 알려주는데 처음에 좀 귀찮을 수 있습니다.
귀찮더라도 한 번 해놓으면 됩니다.
저는 귀찮아서 하지않았고, 제가 받은 답변은 아래 붙여넣어 드릴게요. 잘 안되면 AI에게 질문.
brew update/upgrade launchd 등록하기
brew 경로 찾기
which brew
- 애플 실리콘(M시리즈): /opt/homebrew/bin/brew
- 인텔 맥: /usr/local/bin/brew
아래는 M시리즈 맥 기준.
업데이트 스크립트
- mkdir -p ~/bin
- nano ~/bin/homebrew-update.sh
- 아래 내용 복붙, 저장
#!/bin/zsh

/opt/homebrew/bin/brew update
/opt/homebrew/bin/brew upgrade
/opt/homebrew/bin/brew cleanup
chmod +x ~/bin/homebrew-update.sh 입력으로 실행 권한 주고, ~/bin/homebrew-update.sh 입력으로 테스트로 잘 되는지 확인
launchd 설정 파일
nano ~/Library/LaunchAgents/com.homebrew.autoupdate.plist 만들어서 아래 내용 입력
<?xml version="1.0" encoding="UTF-8"?>
<!DOCTYPE plist PUBLIC "-//Apple//DTD PLIST 1.0//EN"
  "http://www.apple.com/DTDs/PropertyList-1.0.dtd">

<plist version="1.0">
<dict>

    <key>Label</key>
    <string>com.homebrew.autoupdate</string>

    <key>ProgramArguments</key>
    <array>
        <string>/Users/USERNAME/bin/homebrew-update.sh</string>
    </array>

    <key>StartCalendarInterval</key>
    <dict>
        <key>Weekday</key>
        <integer>0</integer>
        <key>Hour</key>
        <integer>8</integer>
        <key>Minute</key>
        <integer>0</integer>
    </dict>

    <key>StandardOutPath</key>
    <string>/tmp/homebrew-autoupdate.log</string>

    <key>StandardErrorPath</key>
    <string>/tmp/homebrew-autoupdate-error.log</string>

</dict>
</plist>- 빨간색으로 username이라고 강조해놓은거 본인 유저 네임으로 바꾸세요.
- 본인 닉네임 갑자기 안떠오르면 whoami 입력
- StartCalendarInterval 부분은 본인이 원하는 시간대, 날짜로 변경하시면 됩니다. 위의 것은 매주 일요일 8시 입니다.
launched 등록
- launchctl bootstrap gui/$(id -u) ~/Library/LaunchAgents/com.homebrew.autoupdate.plist
- launchctl print gui/$(id -u)/com.homebrew.autoupdate
3. brew autoupdate
homebrew 공식 관리자의 Tap 입니다. 깃헙 주소 https://github.com/domt4/homebrew-autoupdate
신뢰할 수 있음, 편함 두 가지가 마음에 들어서 이 방식을 택했습니다.
설치 방법
- brew tap domt4/autoupdate
- brew trust –command domt4/autoupdate/autoupdate
1번에서 알려드린 자체 오토 업데이트 기능과 차이는 아래와 같다고 합니다.
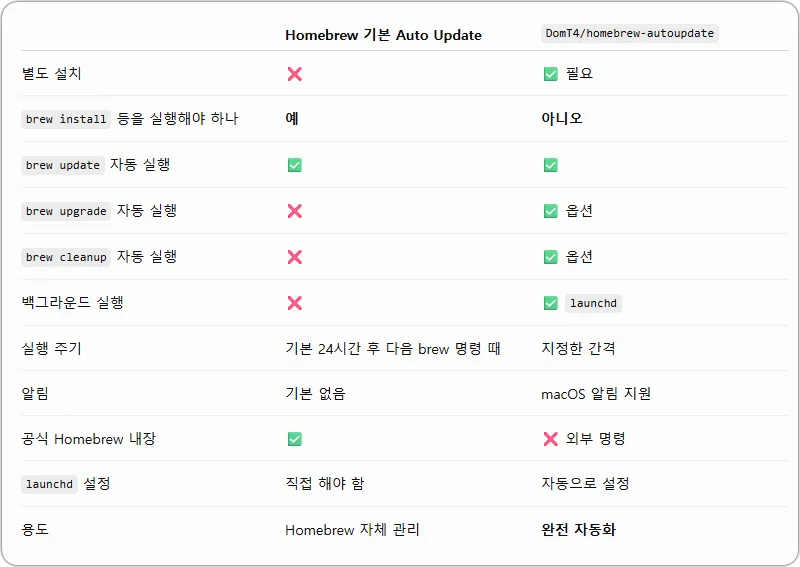
사용 방법
간단합니다.
기본
brew autoupdate start 12h --upgrade --cleanup --immediate --sudo 이것 입력으로 끝. (저는 시간을 3일마다 업데이트 하고 싶어서 3d로 지정) 이러면 update, upgrade, cleanup이 백그라운드에서 자동 실행됩니다. (–upgrade 옵션이 들어가야 formula/cask들이 자동 업그레이드 됩니다.)
특정 앱 자동 업그레이드
만약 특정 앱만 주기적으로 업데이트 하실거면 --only=앱1,앱2,앱3 이 옵션을 넣으면 됩니다. 그럼 아래와 같이 되겠죠.
brew autoupdate start 12h --upgrade --cleanup --immediate --only=firefox,visual-studio-code,iterm2 --sudo
만약 특정 앱을 빼거나 추가하시려면 brew autoupdate delete 후 다시 작성하라고 합니다.
sudo 필요한 앱
만약 sudo가 필요한 패키지가 있으시면, GUI 비밀번호 입력창을 띄울 수 있게 pinentry-mac라는 것을 설치해야한다고 합니다. – brew install pinentry-mac
자세한 옵션 설명
From tap: domt4/autoupdate
Usage: brew autoupdate subcommand [options]

An easy, convenient way to automatically update Homebrew.

This script will run brew update in the background once every 24 hours (by
default) until explicitly told to stop, utilising launchd.

Start autoupdating with:
  brew autoupdate start [interval] [options]

The interval defaults to 24 hours. It can be provided as seconds or as a
duration such as 30m, 12h, 1d, or 1w, or as a 24-hour clock time such as
00:00 to run daily at that specific time instead of relative to when the
command was run.

Common start options:
  --upgrade upgrades installed formulae and casks.
  --cleanup cleans Homebrew's cache and logs after a successful run.
  --immediate runs immediately and whenever the launch agent is loaded.
  --only=wget,node,firefox upgrades only the listed packages.
  --leaves-only upgrades only top-level formulae.
  --greedy includes auto-updating casks.
  --sudo enables a GUI password prompt for cask upgrades.
  --ac-only skips runs while the Mac is on battery power.
  --notify-on-error shows notifications only for failed runs.
  --no-notify disables notifications.

Examples:
  brew autoupdate start
  brew autoupdate start 12h --upgrade --cleanup --immediate
  brew autoupdate start 1d --upgrade --only=wget,node,firefox
  brew autoupdate start 00:00 --upgrade --cleanup
  brew autoupdate logs --lines=50
  brew autoupdate logs --follow

Run brew autoupdate start --help or brew autoupdate logs --help for complete
options for those subcommands.

Subcommands:
  start:
    Start autoupdating in the background.
  stop:
    Stop autoupdating while retaining the launch agent, configuration, and logs.
  delete:
    Stop autoupdating and delete its launch agent, configuration, and logs.
  status:
    Show whether autoupdate is running and describe its installed configuration.
  version:
    Show this tool's current version and a short changelog.
  logs:
    Show output from autoupdate runs.

  -d, --debug                      Display any debugging information.
  -q, --quiet                      Make some output more quiet.
  -v, --verbose                    Make some output more verbose.
  -h, --help                       Show this message.

From tap: domt4/autoupdate
Usage: brew autoupdate start [interval] [options]:
    Start autoupdating in the background. The interval defaults to 24 hours and
accepts seconds or a suffix such as 30m, 12h, or 1d, or a 24-hour clock
time such as 00:00 to run daily at that specific time.

  -d, --debug                      Display any debugging information.
  -q, --quiet                      Make some output more quiet.
  -v, --verbose                    Make some output more verbose.
  -h, --help                       Show this message.
      --upgrade                    Automatically upgrade installed formulae and
                                   casks.
      --greedy                     Include auto-updating casks when upgrading.
      --cleanup                    Automatically clean Homebrew's cache and
                                   logs.
      --immediate                  Run immediately and on login instead of
                                   waiting for the first interval.
      --sudo                       Open a GUI password prompt when a cask
                                   upgrade requires sudo. Requires
                                   pinentry-mac to be installed.
      --leaves-only                Upgrade only top-level formulae that are not
                                   dependencies.
      --only                       Upgrade only these formulae and/or casks
                                   (comma-separated). Requires --upgrade.
      --ac-only                    Run only while the Mac is connected to AC
                                   power.
      --notify-on-error            Notify only when an autoupdate run fails.
      --no-notify                  Disable autoupdate notifications.

From tap: domt4/autoupdate
Usage: brew autoupdate logs [options]:
    Show output from autoupdate runs.

  -d, --debug                      Display any debugging information.
  -q, --quiet                      Make some output more quiet.
  -v, --verbose                    Make some output more verbose.
  -h, --help                       Show this message.
  -f, --follow                     Follow the log as new output is written.
  -n, --lines                      Show this many lines from the end of the log.
                                   Defaults to 10.
에러
제가 겪어서 적어놓습니다. 알림 센터에 뭐가 떴는데 모르고 지워버렸어요.
brew autoupdate status 입력해보시면 마지막에 log 파일 경로가 나와요.
Logs: /Users/username/Library/Logs/com.github.domt4.homebrew-autoupdate/com.github.domt4.homebrew-autoupdate.out
여기서 로그를 확인하면 에러 메세지를 보실 수 있습니다. 저의 경우엔 패키지 하나가 업데이트 안되는 문제가 있었어요.
Updating Homebrew...
fatal: could not read Username for 'https://github.com': terminal prompts disabled
Error: '패키지 이름' does not exist! Run brew untap 'ooooo' to remove it.
이런 오류가 뜨면 해당 프로젝트 탭에 문제가 생겨서 그렇습니다. 아마도 프로젝트가 중단되어 Github 저장소가 삭제됐을 가능성이 커요. 드물게 이름이 바뀌는 경우도 있고요. 에러 메세지 마지막에 run brew untap으로 시작하는 명령어를 복사해서 실행하시면 됩니다.
좋은 정보 감사합니다.
zerobrew라는 것도 있더라고요. 이거 혹시 써보셨나요?
https://wikidocs.net/blog/@jaehong/7809/
https://github.com/zerobrewhq/zerobrew
저도 그거 혹 하다가 Cask 지원 안한다고 그래서 사용과 소개를 보류했어요
그러네요? 아니 이 무슨
ㅋㅋㅋ 저도 설치하기 전에 알고 바로 취소 ㅋㅋ